
DICE focuses on the quality assurance for data-intensive applications (DIA) developed through the Model-Driven Engineering (MDE) paradigm. The project aims at delivering methods and tools that will help satisfying quality requirements in data-intensive applications by iterative enhancement of their architecture design. One component of the tool chain developed within the project is the DICE IDE. It is an Integrated Development Environment (IDE) that accelerates the development of data-intensive applications.
The Eclipse-based DICE IDE integrates most of the tools of the DICE framework and it is the base of the DICE methodology. As highlighted in the deliverable D1.1 State of the Art Analysis, there does not exist yet any MDE IDE on the software market through which a designer can create models to describe and analyse data-intensive or Big Data applications and their underpinning technology stack. This is the motivation for defining the DICE IDE.
The DICE IDE is based on Eclipse, which is the de-facto standard for the creation of software engineering models based on the MDE approach. DICE customizes the Eclipse IDE with suitable plug-ins that integrate the execution of the different DICE tools, in order to minimize learning curves and simplify adoption. In this blog post we explain how the DICE tools introduced to the reader earlier have been integrated into the IDE. So, How’s the DICE IDE built?
How the DICE IDE is built?
The DICE IDE is an application based on Eclipse. While the Eclipse platform is designed to serve as an open platform for tool integration, it is architected so that its components could be used to build any arbitrary client application. The minimal set of plug-ins needed to build a rich client application is collectively known as the Rich Client Platform (RCP). Applications other than IDEs can be built using a subset of the platform. These rich applications are still based on a dynamic plug-in model, and the UI is built using the same toolkits and extension points. The layout and function of the workbench is under fine-grained control of the plug-in developer.
An Eclipse application consists of several Eclipse components, as a developer you can extend the Eclipse IDE via plug-ins (components). Eclipse applications incorporate runtime features based on OSGi. In this runtime environment, you can update/delete/create features to your application using OSGi Bundles (Components).
The minimum piece of software that can be integrated in Eclipse is called a plug-in. The Eclipse platform allows the developer to extend Eclipse applications like the Eclipse IDE with additional functionalities via plug-ins.
Eclipse applications use a runtime based on a specification called OSGi. A software component in OSGi is called a bundle. An OSGi bundle is also always an Eclipse plug-in. Both terms can be used interchangeably.
The Eclipse IDE is basically an Eclipse RCP application to support development activities. Even core functionalities of the Eclipse IDE are provided via a plug-in. For example, both the Java and C development tools are contributed as a set of plug-ins. Therefore, the Java or C development capabilities are available only if these plug-ins are present.
The Eclipse IDE functionality is heavily based on the concept of extensions and extension points. For example, the Java Development Tools provide an extension point to register new code templates for the Java editor.
Via additional plug-ins you can contribute to an existing functionality, for example new menu entries, new toolbar entries or provide completely new functionality. But you can also create completely new programming environments.
The minimal required plug-ins to create and run a minimal Eclipse RCP application (with UI) are the two plug-ins “org.eclipse.core.runtime” and “org.eclipse.ui”. Based on these components an Eclipse RCP application must define the following elements:
- Main program – a RCP main application class implementing the interface “IApplication”. This class can be viewed as the equivalent to the main method for standard Java application. Eclipse expects that the application class is defined via the extension point “org.eclipse.core.runtime.application”.
- A Perspective – it defines the layout of your application. Must be declared via the extension point “org.eclipse.ui.perspective”.
- Workbench Advisor- invisible technical component which controls the appearance of the application (menus, toolbars, perspectives, etc.)
DICE Tools integration approaches
The Eclipse-based DICE IDE integrates most of the tools of the DICE framework. Due to the different nature of the tools, not all of them have the ability to get integrated completely within the IDE. It is necessary to provide a solution for that. Some of the tools have the real execution environment available outside the IDE (not eclipse plugins), for instance, in an external web site, or in an external server.
The DICE IDE offers two ways of get integrated:
- Fully integrated
- Externally integrated
Both integrations have a common component of integration within the IDE. This component contributes the IDE with a menu, through which the user can interact with all the integrated tools (Figure 1).
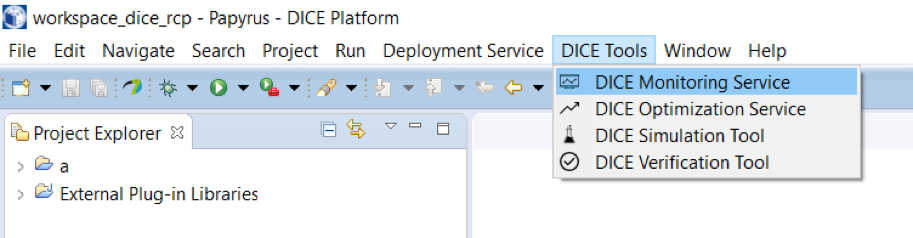
Figure 1. The menu for a DICE tool in the DICE IDE.
External integration:
This approach is the easiest. It is used when the real execution environment of the tool is placed outside the IDE, for instance within an external server or web service.
The only required information for this approach is to provide the needed information to connect to the external application, typically a URL:
- Protocol: HTTP or HTTPS
- Server: the address of the server
- Port: the port where the server remains available
- Parameters: possible parameters to be passed when the web service is visited (user id, token…)
There exists a plug-in that implements an abstract mechanism that is offered to all of the tools that prefers this kind of integration. This plug-in adds support to open the internal web browser of Eclipse with the given page, allowing the user to access to it within the IDE. An example of such an integration is given on the Figure 2 with the DICE Monitoring tool.
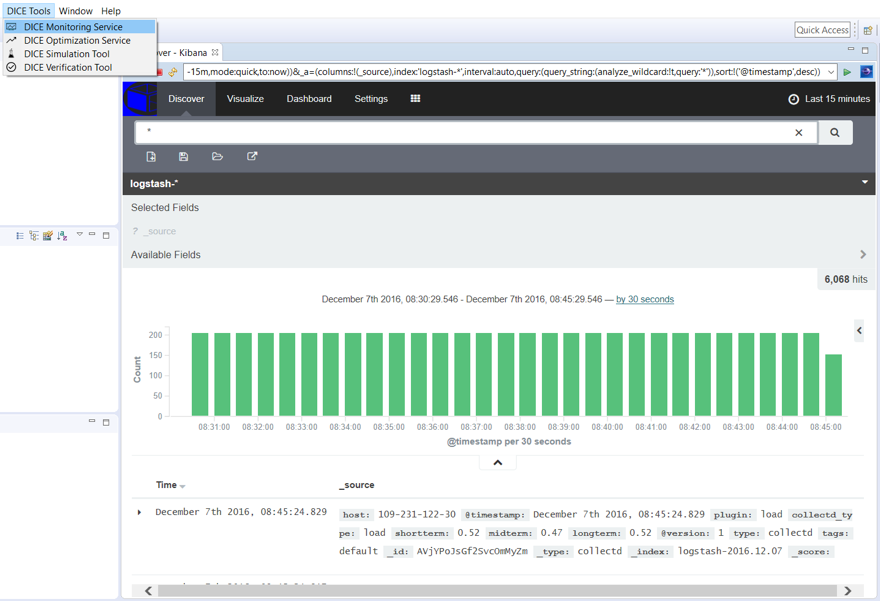
Figure 2. Example of Monitoring Tool, an external tool integration.
The IDE also provides an abstract Eclipse Preferences page that allows the user to modify these properties (Figure 3). In this way, the external web server tool integration can be modified dynamically by the user if needed.
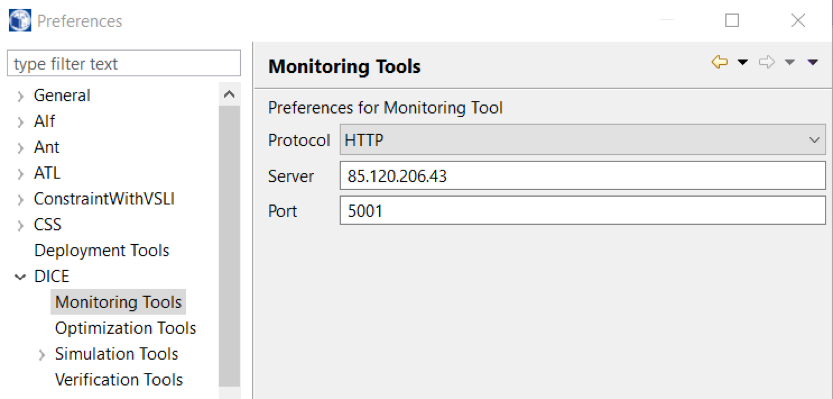
Figure 3. Example of Monitoring Tool external web service configuration.
Full integration:
This approach requires much effort by the tool owner, as it is intended to develop a fully functional architecture in the IDE that allows the user to interact with the tool and perform all the needed operations.
It is required to have some Eclipse development skills. There are lots of Eclipse tutorials available on Internet that can be used to learn how to develop Eclipse plug-ins and contribute the IDE to provide new functionality like wizards, dialogs, launchers, views…
Depending on how complex is the tool, it will be more or less difficult to integrate it within the IDE.
The Figure 4 shows an example of fully integrated tool. In this case, it is the Simulation tool.
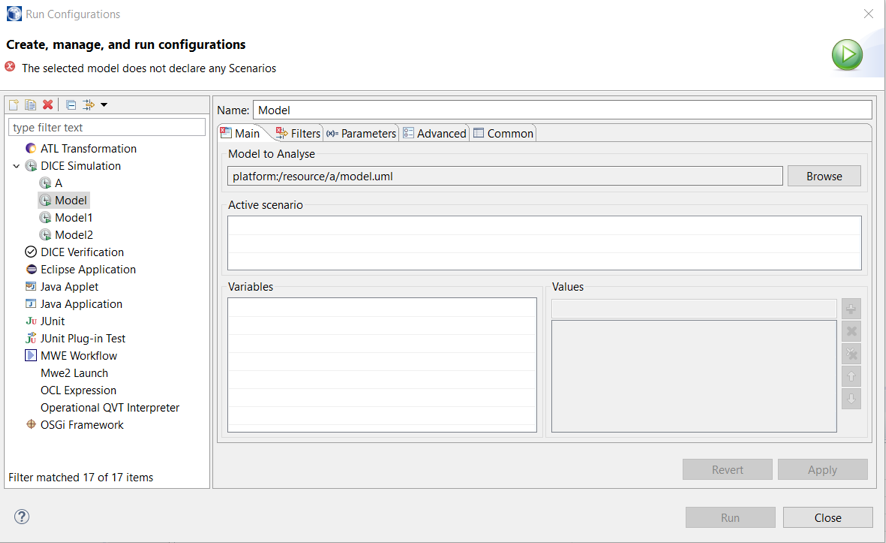
Figure 4. An example of the Simulation Tool, a fully integrated tool.
Conclusions
This post described the basic features of the DICE IDE, in particular the dual integration patterns provided by the integrated environment, and examples of integrated DICE Tools. Due to the different nature of the tools, not all of them have the ability to get integrated completely within the IDE. All tools, independently of the integration used, are accessible through the menu item.
The IDE has been released in January 2017 on GitHub as part of the DICE Knowledge Repository. A complete tutorial and a Youtube channel allow any interested designers, administrators, quality engineers or system architect to start quickly with the IDE.
Christophe Joubert, Ismael Torres (PRO)
Sorry, the comment form is closed at this time.